X3 Configure the Project
10:25–11:05 · 40 minutes
- Time: 40 minutes
- You produce: three milestones with justified dates; a Project, copied from the showcase and linked to your repository; your six sub-issues in it, with the priorities and dates that you chose; and one “blocked by” dependency.
- New terms: Project, milestone, view, field, Project workflow, dependency. All terms are in the cheat sheet.
Why this step
Issues describe the work. A Project shows the work as a plan: what is waiting, what is in progress, and what happens when. A Project belongs to your account, not to the repository. You link it to the repository, and you set its visibility separately. A public repository can have a private Project, and the reverse.
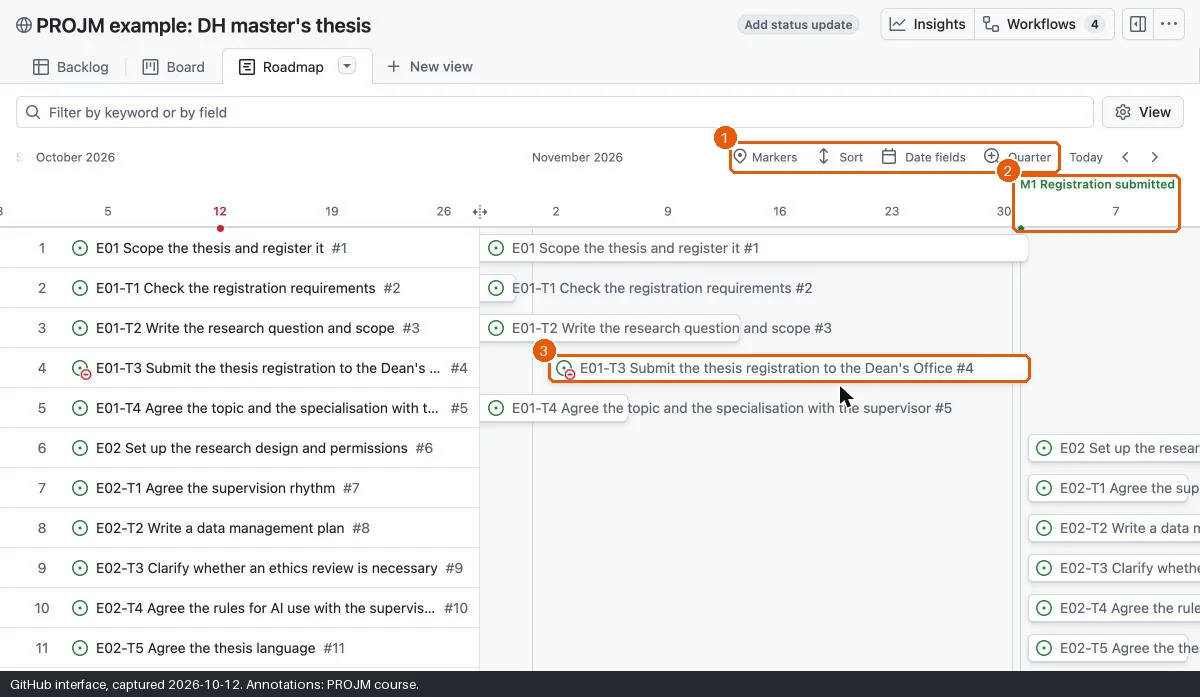
A plan needs time. GitHub offers two different tools for time, and they answer different questions. A milestone groups Issues under one due date in the repository: “What must be ready for the registration?” Date fields in the Project give each Issue a start and a target: “When do I work on this?” The roadmap shows both together. Milestones and the roadmap form a phase plan; the board adds a Kanban view of the daily work (Approaches).
Order matters too. “Submit the registration” cannot start before “Check the registration requirements” ends. This is a dependency (“blocked by”), not a hierarchy. A parent-child relation says “this is part of that”; a dependency says “this waits for that”. Keep the two apart.
The fields and the views are the same for every thesis, so you copy them from the showcase Project. The decisions stay with you: the priorities, the dates, and the justification of each milestone. Milestone dates need a justification. The fictional registration (2026-12-01) and submission (2027-06-01) stand in for official dates of the Dean’s Office; the six months between them follow the DH study plan, Art. 15 Abs. 4. The middle milestone is your own estimate, and you may move it. Never move an official date silently.
Before you start
You finished X2.
Open the showcase Project in a second tab.
Command-line route: open a terminal in the folder
projm-thesis. Rungh auth statusand check that the token scopes includeproject. If they do not, rungh auth refresh -s project.Command-line route: define the helper
issue. It prints the number of an Issue from the start of its title, for exampleissue E01-T3. The commands on this page use it, so your numbers can differ from the examples. Define it again in each new terminal.issue() { gh issue list --state all --limit 100 --json number,title \ --jq ".[] | select(.title | startswith(\"$1 \")) | .number"; }
Steps
Create the milestones
- Click Issues, then Milestones, then New milestone.
- Type the title
M1 Registration submittedand the due date2026-12-01. - In Description, write the justification. The milestones of the example repository show one for each date.
- Click Create milestone.
- Repeat for
M2 Data documented and validated(2027-03-01, proposed) andM3 Thesis submitted(2027-06-01). - Open each sub-issue and set its milestone in the sidebar: E01 tasks → M1, E08-S1 and E08-T2 → M2, E08-T3 → M3.
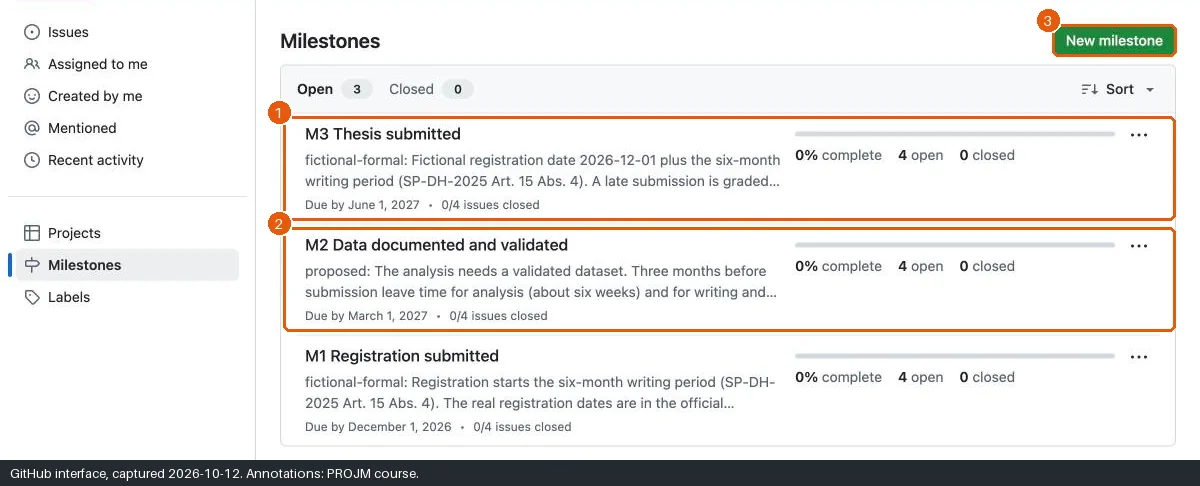
Read the justifications of the example repository. There is one for each date:
gh api "repos/maehr/projm-example-thesis/milestones?state=all" --jq '.[] | .title + ": " + .description'Create the three milestones. Replace each
JUSTIFICATIONwith your own justification of the date. Type{owner}and{repo}as shown: gh fills in your repository. Keep the timeT12:00:00Z: withT00:00:00Z, GitHub stores the day before.gh api repos/{owner}/{repo}/milestones --jq .title -f title="M1 Registration submitted" \ -f due_on=2026-12-01T12:00:00Z -f description="JUSTIFICATION" gh api repos/{owner}/{repo}/milestones --jq .title -f title="M2 Data documented and validated" \ -f due_on=2027-03-01T12:00:00Z -f description="JUSTIFICATION" gh api repos/{owner}/{repo}/milestones --jq .title -f title="M3 Thesis submitted" \ -f due_on=2027-06-01T12:00:00Z -f description="JUSTIFICATION"Set the milestone of each sub-issue. The helper
issuefinds the number of each Issue.gh issue edit $(issue E01-T1) $(issue E01-T2) $(issue E01-T3) --milestone "M1 Registration submitted" gh issue edit $(issue E08-S1) $(issue E08-T2) --milestone "M2 Data documented and validated" gh issue edit $(issue E08-T3) --milestone "M3 Thesis submitted"Check the result. Each sub-issue shows its milestone:
gh issue list --json number,title,milestone --jq '.[] | "\(.number) \(.milestone.title) \(.title)"'
Copy the Project
- Open the showcase Project.
- Click … (top right), then Make a copy.
- Under Owner, select your account.
- Type the name
PROJM thesis plan. Do not select Draft issues. - Click Copy project. The copy opens. It has the views, the fields, and the workflows of the showcase, but no Issues.
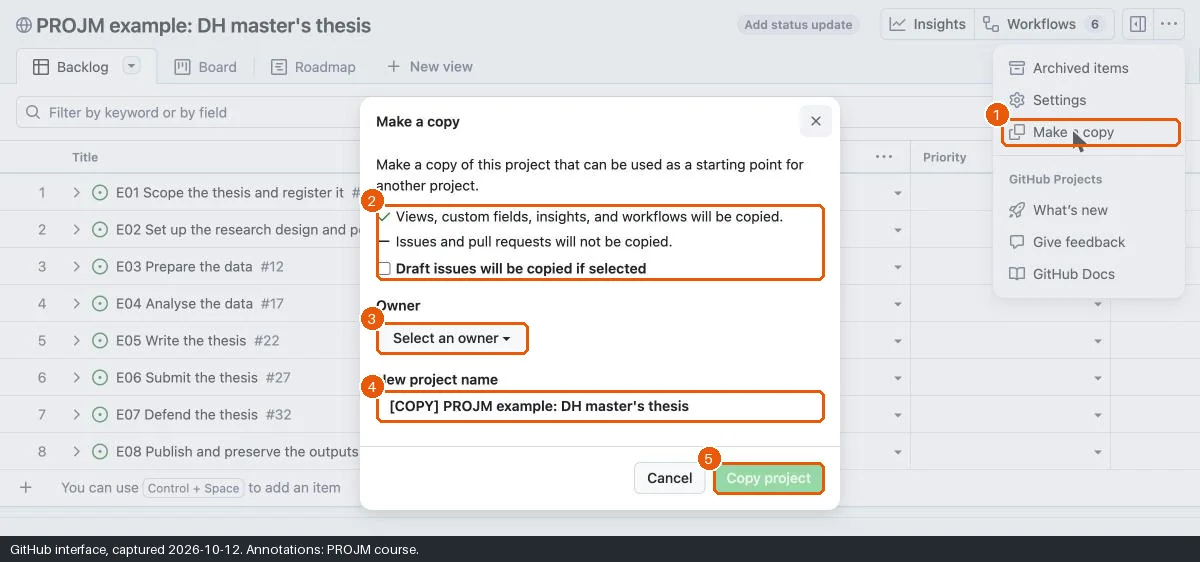
Copy the showcase Project into your account:
gh project copy 11 --source-owner maehr --target-owner @me --title "PROJM thesis plan"Read the address that gh prints. The number at the end is the number of your Project. The commands on this page use
12. Replace12with your number.
Link the Project and set its visibility
- Open your repository. Click Projects, then Link a project.
- Select
PROJM thesis planand click Save. - Open the Project. Click …, then Settings.
- Under Danger zone, check Visibility. A copy starts private. Select Public only on the public path.
Link the Project to the repository of the folder. Do not add
--owner @me: with it, the command fails.gh project link 12On the public path, make the Project public. A copy starts private. On the private path, skip this step.
gh project edit 12 --owner @me --visibility PUBLIC
Pair: give your partner access
Skip this step if you work alone.
gh has no command for Project access. To open your Project from the terminal, run gh project view 12 --owner @me --web.
- Open the Project. Click …, then Settings.
- Click Manage access. Invite your partner with the role Write. Access to the repository does not include access to the Project.
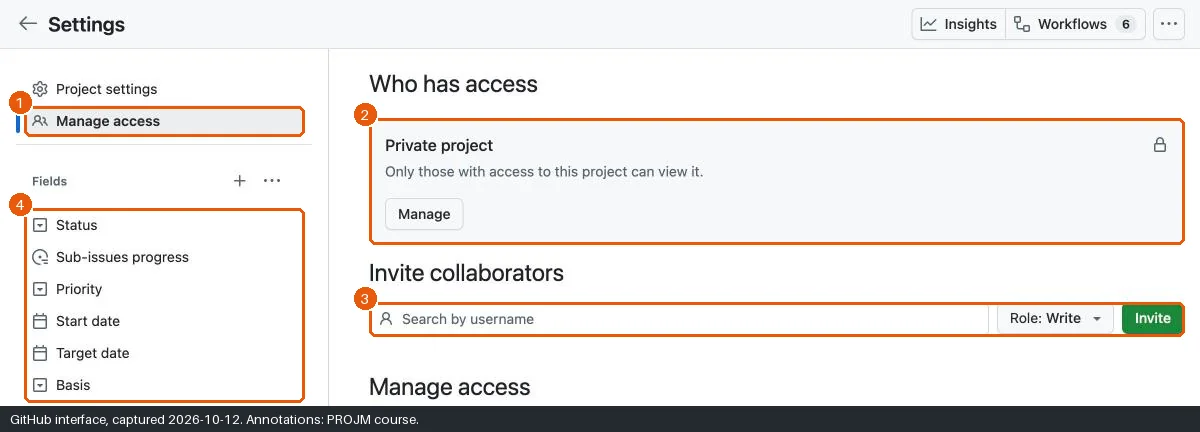
Add the Issues
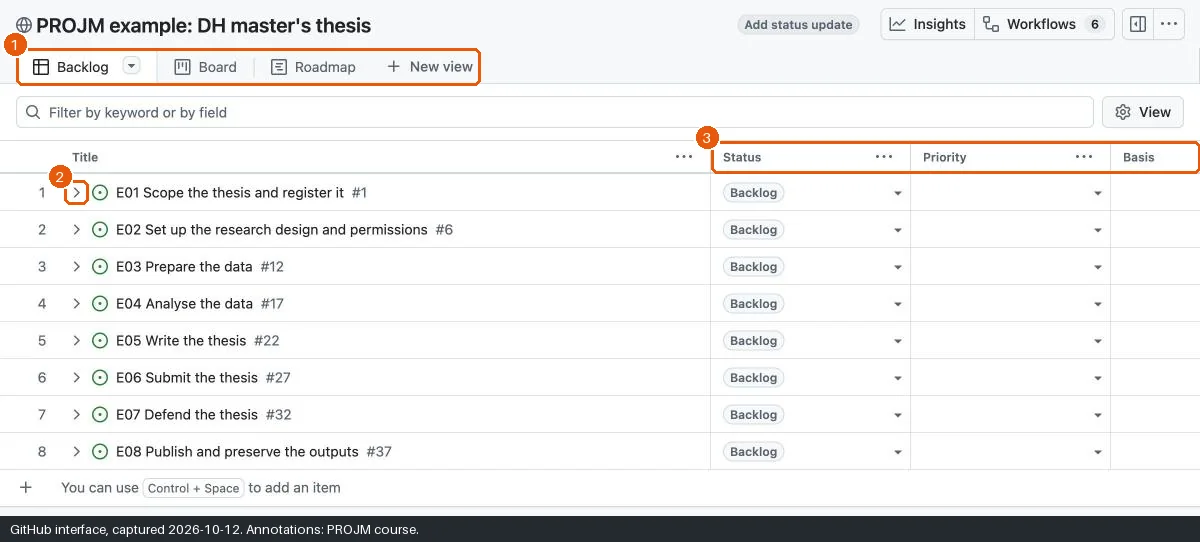
- In the Project table, click + at the bottom (or press
Ctrl+Space). - Type
#, select your repository, and select the epic E01. - Repeat for E08.
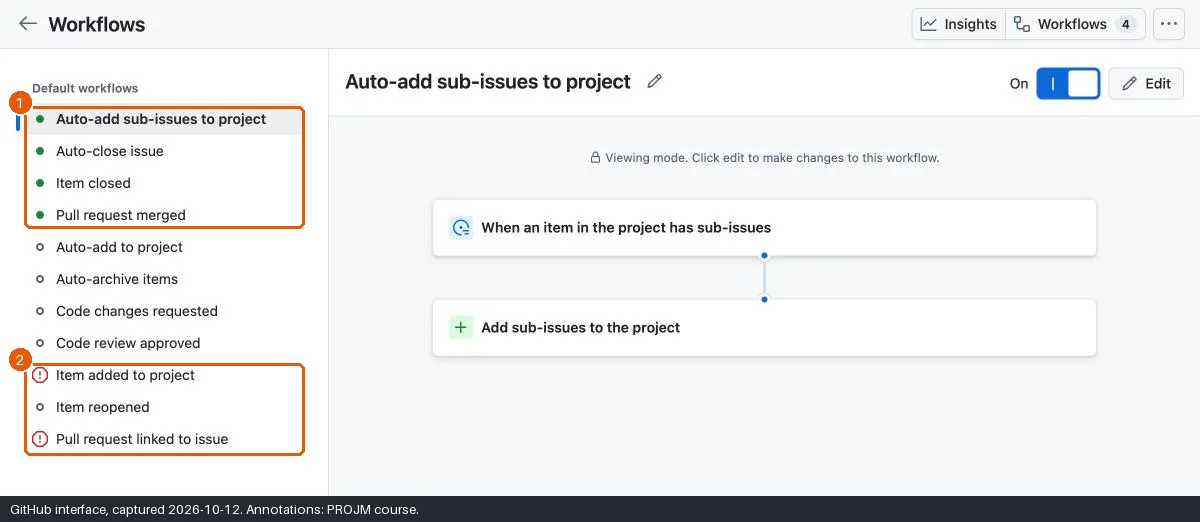
- The workflow Auto-add sub-issues to project adds the six sub-issues. New items get the Status Backlog. If a sub-issue is missing, add it the same way.
Add the two epics to the Project. Add one Issue per command.
gh issue edit $(issue E01) --add-project "PROJM thesis plan"
gh issue edit $(issue E08) --add-project "PROJM thesis plan"
List the items. The workflow Auto-add sub-issues to project adds the six sub-issues with the Status Backlog. The list shows eight Issues:
gh project item-list 12 --owner @meThe workflow runs with a delay. If the list shows fewer than eight Issues, wait one minute and run the command again.
If a sub-issue is still missing, add it as in step 1, for example gh issue edit $(issue E01-T1) --add-project "PROJM thesis plan".
Decide the priorities and the dates
This step is planning, not copying. You decide, and you can explain each value.
gh can set a field value only with the internal IDs of the Project, the item, the field, and the option. Use the browser for this step. To open your Project from the terminal, run gh project view 12 --owner @me --web.
- For each sub-issue, set Priority (
High,Normal, orLow) and Basis (Rule,Practice, orDemo). - Set a Start date and a Target date for each sub-issue. Each target date must lie before the due date of its milestone.
- Let E01-T3 start after the target date of E01-T1. E01-T3 waits for E01-T1.
- Open milestone M2. Add one sentence to its description: why this date, and what happens if it moves.
- Compare your values with the Backlog view of the showcase Project. Your values can differ. You must be able to justify them.
Check the workflows
gh has no command for Project workflows.
- In the Project header, click Workflows.
- Check that six workflows have a green dot.
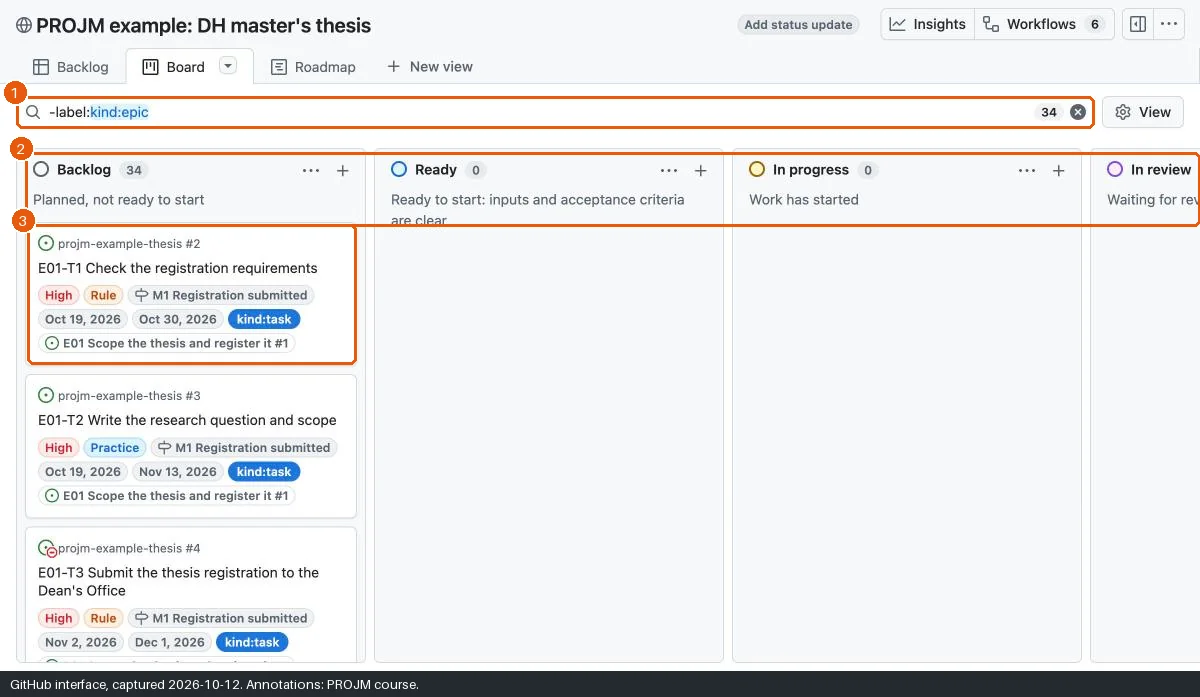
- Check two of them: Pull request linked to issue sets the Status In review, and Item closed sets the Status Done. X4 depends on both.
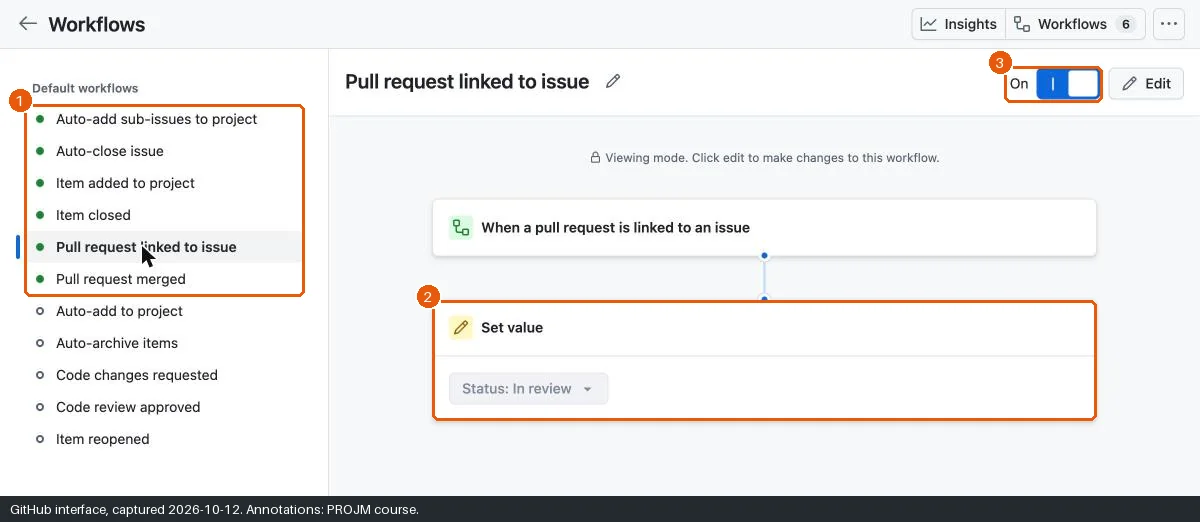
Record the dependency
- Open
E01-T3 Submit the thesis registration to the Dean's Office. - In the sidebar, click the gear icon next to Relationships.
- Select Mark as blocked by, then select
E01-T1. Close the list. - Check that the pill “Blocked by: E01-T1” appears under the title.
- Optional: mark
E08-T3as blocked byE08-T2.
Mark E01-T3 as blocked by E01-T1:
gh issue edit $(issue E01-T3) --add-blocked-by $(issue E01-T1)Check the result. The line
blocked-byshows E01-T1:gh issue view $(issue E01-T3)Optional: mark E08-T3 as blocked by E08-T2:
gh issue edit $(issue E08-T3) --add-blocked-by $(issue E08-T2)
Optional: build a Project yourself
Do this after the workshop, or if the copy fails. It shows how the copied Project works.
gh can create a Project and its fields, but not its views or its workflows.
- In your repository, click Projects, then New project. Select Table and name the Project.
- In the table header, click + and select New field. Create
Priority(single select:High,Normal,Low),Basis(single select:Rule,Practice,Demo),Start date, andTarget date(date). - Open the settings of the field Status. Set the options to
Backlog,Ready,In progress,In review,Done. - Rename the first view to
Backlog. Click New view, select Board, name itBoard, and type-label:kind:epicin the filter. - Click New view, select Roadmap, and name it
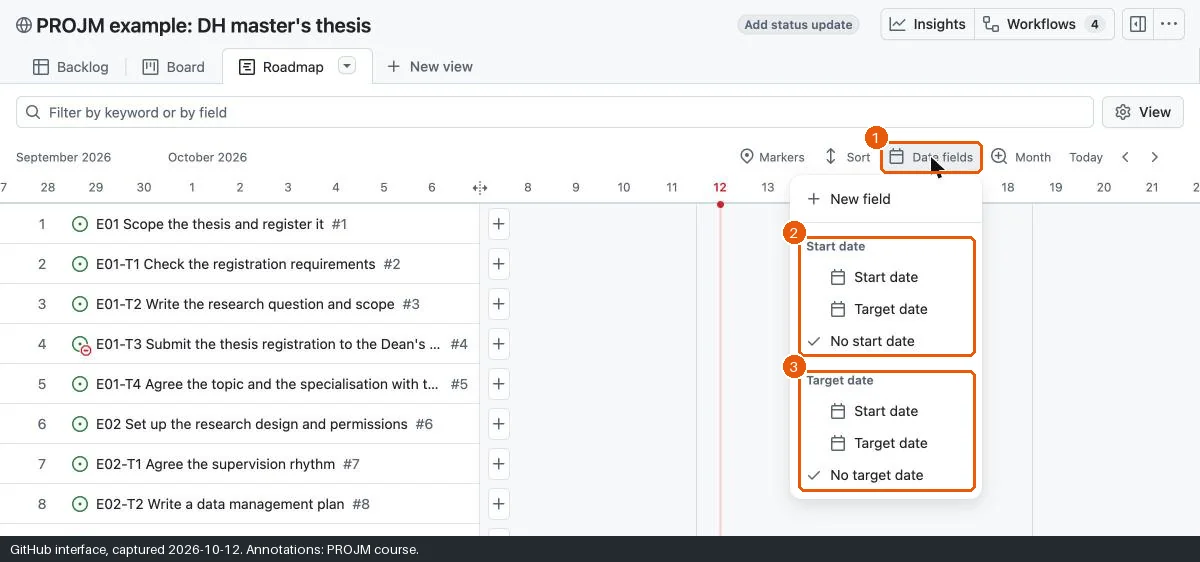
Roadmap. Click Date fields and selectStart dateandTarget date. Click Markers and select Milestone. Set the zoom to Quarter. - Click View, then Save view, then Save in the confirmation dialog.
- Click Workflows. Select Pull request linked to issue, click Edit, and set the value
Status: In review. Save the workflow and turn it on.
Change the Status options before you rely on the workflows. A workflow that used a renamed option stops with an error. Open Workflows and select the new option again.
Expected state
If something goes wrong
| Problem | Cause | Recovery |
|---|---|---|
| Make a copy is missing. | You are not signed in, or you opened the Project from a phone. | Sign in. Use a desktop browser. |
| The copy is private, but you chose the public path. | A copy always starts private. | … → Settings → Danger zone → Visibility. |
| Your partner cannot see the Project. | Repository access does not include Project access. | … → Settings → Manage access → invite the partner with the role Write. |
| The sub-issues do not appear. | The epic was added before the workflow ran, or the workflow is off. | Add each sub-issue with + and #. Check Workflows. |
| The Project does not appear in the repository. | It is not linked. | Projects tab → Link a project. |
| The roadmap shows “Your project needs at least one date or iteration field”. | The view has no date fields selected. | Select the date fields in Date fields. |
| The view settings are lost after a reload. | The changes were not saved. | Click View → Save view, then Save in the dialog. A blue dot means unsaved changes. |
| No gear icon next to Relationships. | The page has not finished loading. | Reload the Issue page and wait. |
| Time runs out. | — | Skip the second dependency and the M2 justification. Add them during X6. |
gh reports that the token is missing the scope project. |
You signed in without access to Projects. | Run gh auth refresh -s project. |
gh project link reports “Could not resolve to a Repository with the name ‘@me/projm-thesis’” or “has different owner from ‘@me’”. |
--owner @me failed in each form that was tested with gh 2.102.0. |
Run gh project link 12 without flags in the folder projm-thesis. |
| gh reports “Your attempt to move this item created a temporary conflict”. | GitHub changed the Project at the same time, for example through a workflow. | Run the command again for the Issue that failed. |
issue E01-T3 prints nothing, or gh reports “command not found: issue”. |
The title does not start with the ID and a space, or the terminal is new. | Check the title with gh issue list. Define the helper again, as in Before you start. |
| A command fails. | Usually the installation, the sign-in, or the folder. | See Command-line problems, or do the step in the browser. |
Alternatives
- Pair: one person copies and links the Project and invites the partner; the other creates the milestones. Decide the priorities and the dates together.
- Private path: keep the copy private. Project visibility does not follow the repository visibility.
Official documentation
- Copying an existing project
- Adding your project to a repository
- Managing visibility of your projects
- Managing access to your projects
- Using the built-in automations
- Creating a project
- Customizing the roadmap layout
- About milestones
- Creating issue dependencies
gh project,gh issue edit, and REST API for milestones